![]()
|
|
|
|
KLX 250/300 Manual Cam Chain Tensioner
I apologize for the small font. Here it goes: Installing the new manual cam chain tensioner: 1. Remove the “automatic” tensioner body from the motor by removing the two small bolts. 2. Remove the large plastic screw plug in the right side alternator cover on singles. See the “magic tool” in the photos. Remove the left side cover for multi-cylinder engines. 3. Back the adjustment bolt out on the new tensioner and remove the plastic sleeves from the mount bolts using an allen wrench and pliers. 4. Put some Yamabond (Hondabond, Kawabond – whatever bond) sealant or a similar goop on the tensioner gasket. I don’t know for sure, but even grease may work fine. 5. Install the tensioner in place threading in the supplied countersunk bolts. There is a small nick on the bottom side of the tensioner body, make sure this edge is down.. 6. Torque the bolts to 72 in/lb (6 ft/lb or 8 N/m per http://www.machinetoolhelp.com/Repairing/bolt-torque-chart.html ) if you wish, I just used a 4 mm allen wrench and my “torque wrench arm”… if you know what I mean. 7. Turn the adjuster bolt in as far as possible by hand while cold or with 6mm ball end of allen wrench, but do not overtighten with allen wrench, keep in mind you are just removing play and not applying tension to the cam chain. 8. Using the appropriate socket and ratchet on the bolt in the end of the crank shaft, a. From the left side, rotate the crank shaft slowly counterclockwise, (from the right side rotate the crank shaft slowly clockwise) which will pull the cam chain taut on the drive side making the tensioner side slack, while turning the tensioner adjustment screw by hand. DO NOT spin the motor over with the starter, you risk jumping cam timing or possible valve damage due to excess chain slack. Do not force the crank if it should hit something solid, you do NOT want to damage a valve. Do not turn the engine over with the starter, that could also result in valve damage. b. Turn the motor over for a few revolutions with the ratchet while tuning the adjuster bolt by hand, the tensioner bolt will turn in easily when taking up slack in the chain, but will resist turning when either the chain is under tension (turning the crank the wrong way) or when the slack has been taken up. Again do not use much leverage on the L bend of the allen wrench. c. You should be able to tell when the slack is gone, the bolt will no longer turn easily. d. Back off 1/6 turn (one flat of the jam nut). e. Using one wrench tighten the tensioner locking nut down tight holding the allen nut with the allen wrench to keep the adjuster bolt from turning.. f. Rotate the crank slowly over again to make sure valves are not out of time and hitting the piston. If you want to attempt fine tuning of the adjustment start the engine and warm it up to operating temperature and: 9. With the engine running, a. Loosen the locking nut and the tensioner bolt enough to hear and/or feel the cam chains tapping on the adjuster bolt. I have picked up a mechanic’s stethoscope to listen for noises like this, about $10 on ebay. b. Gently finger-tighten the tensioner bolt until there is no detectable rattle/vibration. Back out the tensioner bolt slightly until there is detectable light rattle/vibration (listen/feel very carefully, this is extra-fine tuning to make sure you don't over tighten) c. Tighten the tensioner bolt back in slightly (about 1/8 turn or less) until rattle is gone. [If you can not seem to hear any rattle, finger-tighten the bolt that should be sufficient.] d. Tighten the locking nut, holding the tensioner allen nut with the 6mm allen wrench to keep the bolt from turning.
This works without gimmicks and guesswork that can over tighten the chains or let them flail around in the cases. Re-adjust if you hear the light rattle of cam chain again. I’ve only done about 4 adjustments over the past 25,000 miles using the “sound” method on the KLX650. I’ve not done the finger-tighten method on the KLX because it is just as easy to go by sound, I have on an Eliminator 900. The key point is what the tensioner does – it simply takes up excess slack so the chains don’t slap around and wear prematurely. There is no preloading necessary. I’ve only done the initial set up without the fine tune on my Zephyr 550 and it did fine. NOTE: there is an illustration of making a tool to do adjustments, another I learned is to use a ¼” flex drive..
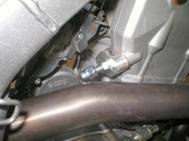
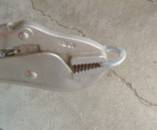
Install tensioner as shown (old nut, not allen type now used). Here’s a handy “tool” to remove the alternator plug… Innovative, huh. On the following, contact me with any questions you may have by email or call me at 330-340-2655. Rotate the crank shaft counterclockwise with a socket and ratchet or breaker bar…
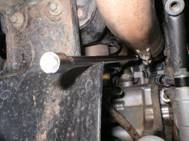
While adjusting the tenisioner bolt in. by hand. Turn the crank several revolutions while doing this to get most all the play out.
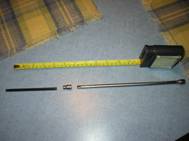
Here is the special set up Thad had set up to make the hot engine adjustment. The aftermarket exhaust makes it quite hot to do. Note the cut off 6mm ball end and ¼ drive extension and 6mm socket. This shows Thad’s adjustment method to get good feel. Warm up the bike and readjust per instructions. |
|
Copyright © 2009
Krieger Cam Chain Tensioners
|